Parse CLI outputs with TextFSM
Update May 26, 2016: The python3 compatible TextFSM fork from Jonathan Slenders is now also available on PyPI and you can install it using pip:
$ pip install jtextfsm
I’ll updated the code example in my python example GitHub repository to use the version from PyPI.
Some weeks ago, I got the request to check some hardware regarding their End of Life state. As long as there are no more than 3 to 4 devices that’s not a big deal, but then I got a text file with > 5000 lines of show inventory output…
We have some Excel based spreadsheets which contains the EoL information for certain products and with an Excel file, the problem could be solved quickly using some formulas. But how to extract the relevant content from the text file and convert it to Excel?
My solution: parse the data using TextFSM.
What is TextFSM?
TextFSM is a template based state machine to parse semi-formatted text into tables. It was developed by Google and is hosted on Google Code. You find also various forks on GitHub, e.g. for python 3 support (which we will later use). It is highly customizable, because it works with separate template definitions, which contains variables and rules with regular expressions. This library is very helpful to parse any text-based CLI output from network devices. TextFSM can be used within python scripts or as a standalone tool. I think you have now an idea, what TextFSM is. Lets start with the example.
Input data for the example
As I already mentioned at the beginning of this post, the text file that I received was a plain concatenation of show inventory commands from various switches separated by -------- lines. I extracted some test data to work with during the creation of the script. The format looks like the following:
switch-1001#sh inventory
NAME: "1", DESCR: "WS-C2960-24TT-L"
PID: WS-C2960-24TT-L , VID: V09 , SN: 12345ABCD
---------------------------------------------------------------------------------------------------
switch-1002#sh inventory
NAME: "1", DESCR: "WS-C2960-48TT-L"
PID: WS-C2960-48TT-L , VID: V02 , SN: 12345ABCD
---------------------------------------------------------------------------------------------------
switch-2001#sh inventory
NAME: "1", DESCR: "WS-C3750X-24"
PID: WS-C3750X-24T-S , VID: V04 , SN: 12345ABCD
NAME: "Switch 1 - Power Supply 0", DESCR: "FRU Power Supply"
PID: C3KX-PWR-350WAC , VID: V02 , SN: 12345ABCD
NAME: "Switch 1 - FRULink Slot 1 - FRULink Module", DESCR: "FRULink 1G Module"
PID: C3KX-NM-1G , VID: V01 , SN: 12345ABCD
NAME: "GigabitEthernet1/1/1", DESCR: "1000BaseLX SFP"
PID: Unspecified , VID: , SN: 12345ABCD
NAME: "2", DESCR: "WS-C3750X-24"
PID: WS-C3750X-24T-S , VID: V04 , SN: 12345ABCD
NAME: "Switch 2 - Power Supply 0", DESCR: "FRU Power Supply"
PID: C3KX-PWR-350WAC , VID: V02 , SN: 12345ABCD
NAME: "Switch 2 - FRULink Slot 1 - FRULink Module", DESCR: "FRULink 1G Module"
PID: C3KX-NM-1G , VID: V01 , SN: 12345ABCD
NAME: "GigabitEthernet2/1/1", DESCR: "1000BaseLX SFP"
PID: Unspecified , VID: , SN: 12345ABCD
NAME: "3", DESCR: "WS-C3750X-24"
PID: WS-C3750X-24T-S , VID: V04 , SN: 12345ABCD
NAME: "Switch 3 - Power Supply 0", DESCR: "FRU Power Supply"
PID: C3KX-PWR-350WAC , VID: V02 , SN: 12345ABCD
NAME: "Switch 3 - FRULink Slot 1 - FRULink Module", DESCR: "FRULink 1G Module"
PID: C3KX-NM-1G , VID: V01 , SN: 12345ABCD
NAME: "GigabitEthernet3/1/1", DESCR: "1000BaseLX SFP"
PID: Unspecified , VID: , SN: 12345ABCD
NAME: "4", DESCR: "WS-C3750X-24"
PID: WS-C3750X-24T-S , VID: V04 , SN: 12345ABCD
NAME: "Switch 4 - Power Supply 0", DESCR: "FRU Power Supply"
PID: C3KX-PWR-350WAC , VID: V02 , SN: 12345ABCD
NAME: "Switch 4 - FRULink Slot 1 - FRULink Module", DESCR: "FRULink 1G Module"
PID: C3KX-NM-1G , VID: V01 , SN: 12345ABCD
NAME: "GigabitEthernet4/1/1", DESCR: "1000BaseLX SFP"
PID: Unspecified , VID: , SN: 12345ABCD
---------------------------------------------------------------------------------------------------
As you might know, the show inventory command produces slightly different output, depending on the type of device (standalone switch, stacked switches etc.). This will lead to some issues as we see later in this post.
The python script
At this point, a basic understanding of the python language is helpful. First we need to install the TextFSM library to our python environment. TextFSM is mainly supported with python 2.x, but I found a python 3.x fork from Jonathan Slenders on GitHub (TextFSM fork, python3 compatible on GitHub), which I will use within this example. You just need to download it, unzip the archive and installed it to your python environment. For the installation, download and unzip the repository. Then go to directory and use the following command:
$ python3 setup.py installThe python script itself was straight forward: import the library, open and read the input file, then parse it through the TextFSM parser and write the results back as a CSV formatted file. This is a bit cheating. At the beginning I mentioned that I need an Excel Spreadsheet, but a CSV file will also do the job, because it can be imported to Excel.
At the end, the python script looks like the following:
import textfsm
# Load the input file to a variable
input_file = open("show_inventory.txt", encoding='utf-8')
raw_text_data = input_file.read()
input_file.close()

# Run the text through the FSM.
# The argument 'template' is a file handle and 'raw_text_data' is a
# string with the content from the show_inventory.txt file
template = open("show_inventory_multiple.textfsm")
re_table = textfsm.TextFSM(template)
fsm_results = re_table.ParseText(raw_text_data)

# the results are written to a CSV file
outfile_name = open("outfile.csv", "w+")
outfile = outfile_name

# Display result as CSV and write it to the output file
# First the column headers...
print(re_table.header)
for s in re_table.header:
    outfile.write("%s;" % s)
outfile.write("\n")

# ...now all row's which were parsed by TextFSM
counter = 0
for row in fsm_results:
    print(row)
    for s in row:
        outfile.write("%s;" % s)
    outfile.write("\n")
    counter += 1
print("Write %d records" % counter)
The next section contains the more difficult but also more interesting part of the story: The TextFSM template.
The TextFSM template
TextFSM requires a definition, how to parse the output. This is expressed in a separate file using a defined structure and some rules with regular expressions. The logic how TextFSM progresses the template is a bit difficult to understand for the first time, but I will try to outline it based on the template which I use in this example.
We will start with a TextFSM template that looks like the following:
Value hostname (\S+)
Value name (.+)
Value description (.*)
Value productid (\S*)
Value vid (\S*)
Value Required serialnumber (\S+)

Start
  ^${hostname}[>#].*
  ^NAME: "${name}", DESCR: "${description}"
  ^PID: ${productid}.*VID: ${vid}.*SN: ${serialnumber} -> Record
The TextFSM template file is structured in two main sections:
- The value definitions, which defines the fields and types that should be extracted
- The state definitions, which defines the rules how to parse the content
The parser of TextFSM will create table records based on a given template definition during the execution. If a regular expression with a value definition matches, the values are extracted based on the associated value definition and then this is added to the Buffer. TextFSM will then continue with the next line of the input file (by default). If the value is already assigned, the content will be replaced.
Within the state definition, we define rules how to parse the input file. These rules instruct the parser, what happens if the regular expression part of the rule matches. As an example, we look at our first rule from the template:
Start
  ^${hostname}[>#].*
The regular expressions will match between the beginning of a line (^) and a prompt (# or >), following by any other character until the end of line. You can see that ${hostname}-expression is a value definition. The content between the beginning of the line and the prompt will be added to the record as the hostname value. This is expressed by the \S+ from the value definition, which means “any non-whitespace character that occurs one or multiple times”.
After the regular expression, an action can be defined that is delimited by an ->. By default, this action is simply Next, which instructs the parser to finish with this input line, go to the next one and use the next rule if the current line matches the regular expression.
The next rule within our state definition will add the name and the description value to the record. This should match the next line in out input file. The same is true for the third line within the state definition, but there is one interesting fact associated with it. We will change the default action to Record to instruct the parser to save the current record and create a new one, because we have now any value for our CVS file. If we won’t use this action, TextFSM will only produce one record from our entire input file.
And now it starts again. The ----- line is simply ignored because it matches no regular expression from our state definition. The next output is the same as explained in the last section. The interesting part begins at line 12. As we see, we are at the following position within the file:
 9switch-2001#sh inventory
10NAME: "1", DESCR: "WS-C3750X-24"
11PID: WS-C3750X-24T-S   , VID: V04  , SN: 12345ABCD
12NAME: "Switch 1 - Power Supply 0", DESCR: "FRU Power Supply"
13PID: C3KX-PWR-350WAC   , VID: V02  , SN: 12345ABCD
Our buffer holds an entire record and after processing line 11, we instruct TextFSM to create a new Record. But now we have an additional part for the same hostname, but we have no hostname value within the record buffer. TextFSM will continue with the regular logic and will match the name and description from line 12, which is added to the buffer, and will create a new record after we parse line 13.
The question is, how can we add the Hostname to the record? The answer is a little statement next to the value definition: Filldown. This instructs TextFSM that the last valid value should be use, if a Record is created without the definition of a value for the given variable (in our case the hostname variable). This should work.
The other specialties in the output are just RegEx “magic”, for example the line that contains the VID but certain parts don’t define this value. For this reason, I use the RegEx pattern \S* for the VID value, which means “zero or more non-whitespace characters”.
Our final template for TextFSM looks like the following:
Value Filldown hostname (\S+)
Value name (.+)
Value description (.*)
Value productid (\S*)
Value vid (\S*)
Value Required serialnumber (\S+)

Start
  ^${hostname}[>#].*
  ^NAME: "${name}", DESCR: "${description}"
  ^PID: ${productid}.*VID: ${vid}.*SN: ${serialnumber} -> Record
The result
After a short execution of the Python script, we got the output.csv file. If we open it in Excel, It should look similar to the following picture (I’ve done some formatting before taking the screenshot):
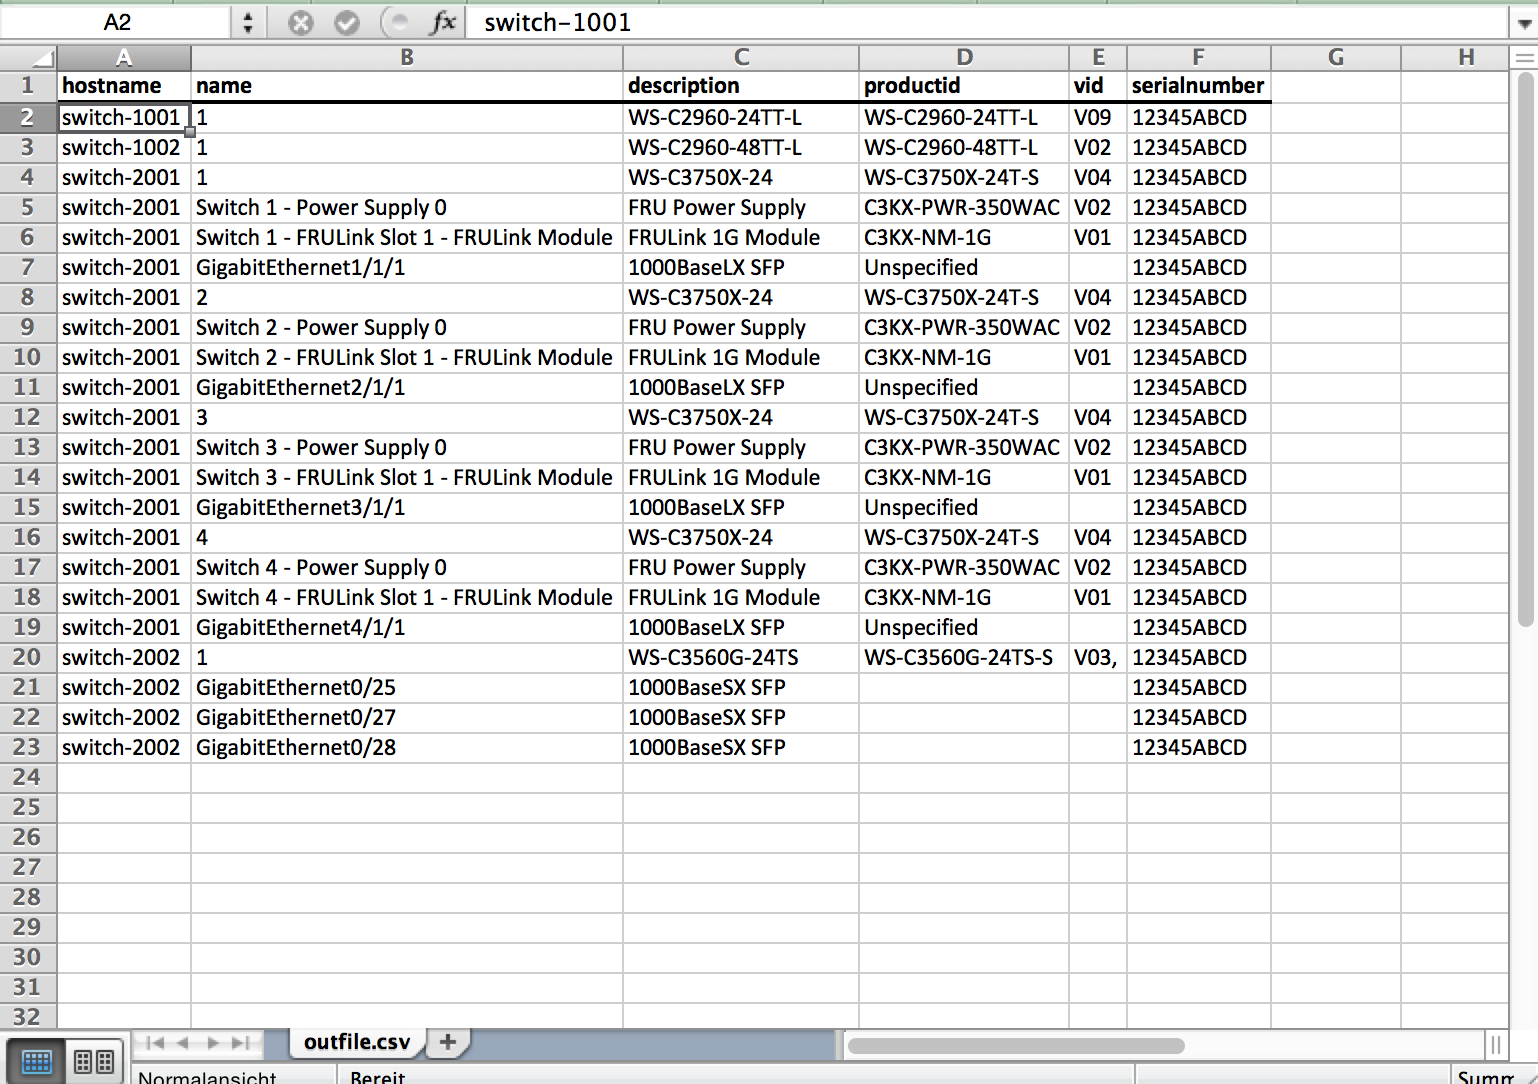
Seems to be working, but to verify that the script has not missed anything, I counted the string PID within the text file and compared the result with the amount of records from TextFSM… 22 records, it works 🙂
Conclusion
Two hour scripting (including the learning how to code with TextFSM) and the problem is solved, I learned something and it saved me a lot of time at least for this part of structuring the data. I know, the script lacks some error handling functionality and the regular expressions are not perfect, but it worked for me so far.
TextFSM is a really great library for processing structured data and I will continue to use it for such a use case. The learning curve is a little stepper, but for me it’s worth it. I skipped the description of the regular expressions, because I think many Network Engineers know these. It’s the same logic as with BGP AS-Path ACL’s on Cisco IOS. TextFSM allows also more complex parsing scenarios, which are described at the Google Code Homepage: TextFSM How-to on Google Code.
The entire script along with the template and test data file is available on my python example GitHub repository.
I hope that helps you in some way and see you next time.