Deploy the Network Configuration Generator on a Server
Update 21st February 2016: A newer version of the web service is already available on GitHub. If you like to see the version from this post, please look at the initial_deployment tag.
This post is part of the series “How to build your own Network Configuration Generator”. You find the overview about the entire series here. The last state of the code is available at the Network Configuration Generator GitHub repository.
In the last posts, I described how the Web service is created and how it works. Now it is time to deploy it on a server. This post contains some background information about server-side python, the deployment of such applications and the automation of the deployment process itself. After reading this post, you’ll know how server-side python works and how to deploy the Network Configuration Generator on a server or within a VM.
I already updated the code on the Network Configuration Generator Github repository some weeks ago. The last commit includes a readme file that provides some information about the tool and the deployment instructions.
Python and Web frameworks (server-side)
Before we start with the deployment process of the Web service, I’ll like to give you some background information on how such an application is deployed within a production environment. If you’re not interested in it and you only want to deploy the Network Configuration Generator, just skip this section.
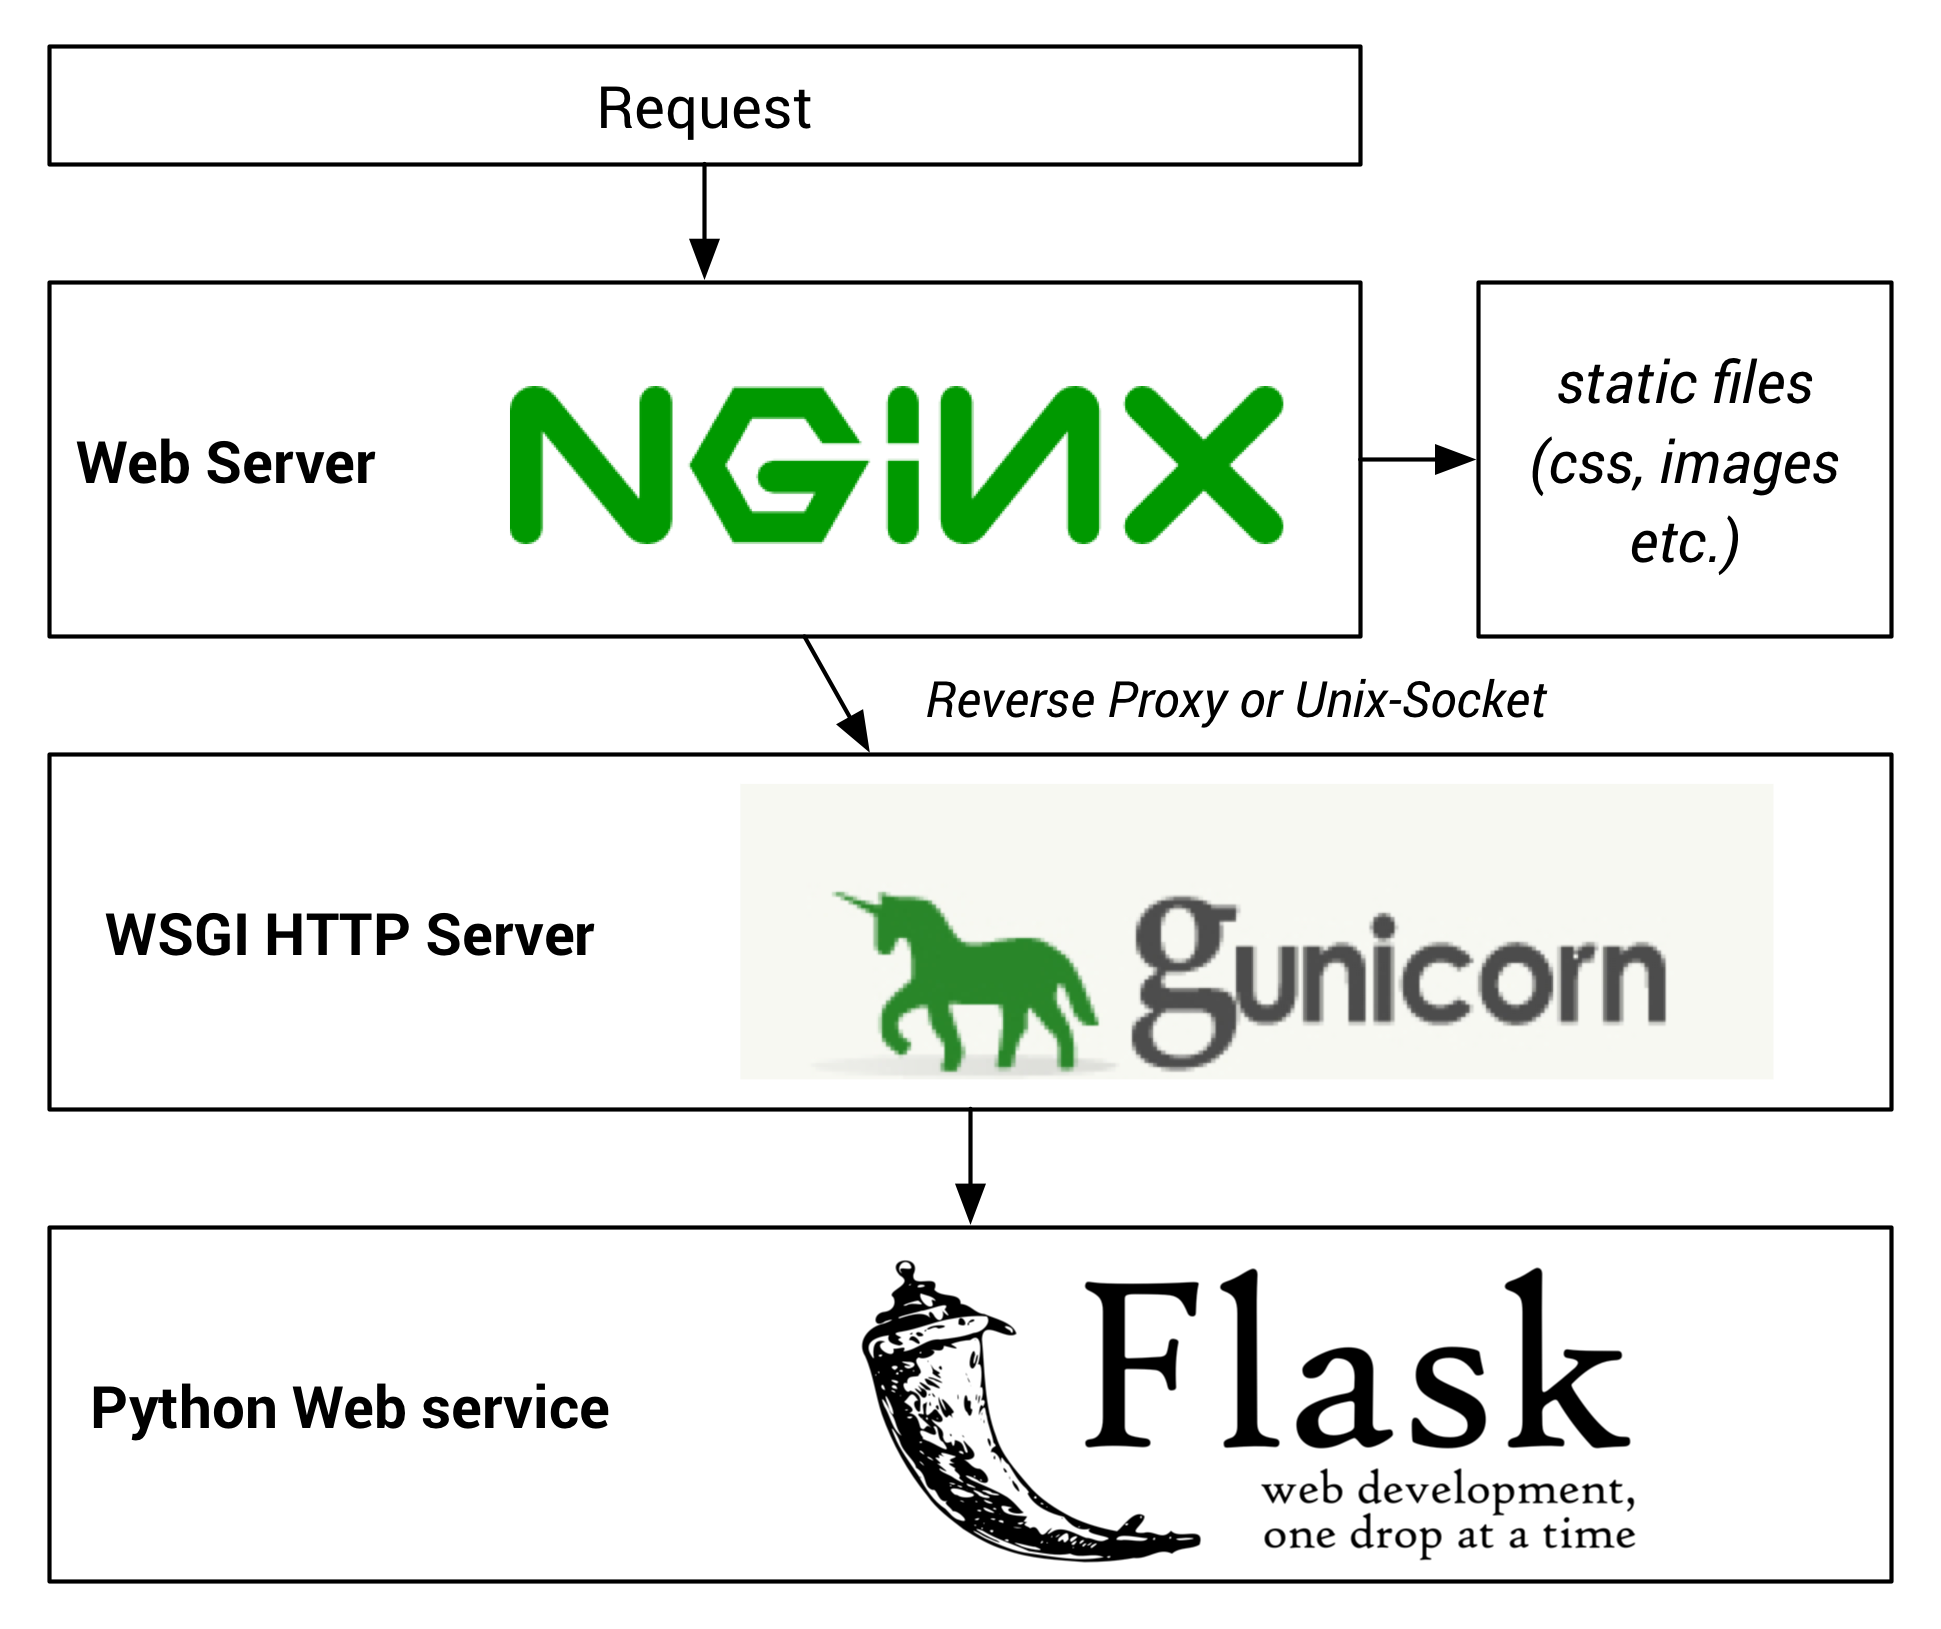
The deployment of python web applications looks a bit complicated if you do this for the first time, because it involves many applications and requirements. As a prerequisite, I assume that you already installed a Ubuntu Linux 14.04 LTS server and you have root privileges on it. The diagram on the right side shows the basic processing of a HTTP request on the Server to the Flask application. The user-facing instance is a normal Web Server. I will use nginx for the Network Configuration Generator. It is used to serve the static files and relays the requests to the WSGI server and therefore to the python web application.
The Web Services Gateway Interface (WSGI) is from a high level perspective a standard interface between a Web server and a web application framework. In this case we will use the gunicorn (Green Unicorn) Python WSGI HTTP Server. There are two ways to connect the nginx with the unicorn: using a reverse proxy (unicorn runs for example on a different port on the same machine, e.g. localhost:8000) or using Unix domain sockets. Because we run the application only on a single server, I’ll use a Unix domain sockets to interconnect these two processes.
The last piece with in the process is the Flask application. Gunicorn provides multiple worker threads, which pass the request to the Flask application. At this point, the processing is similar as with the development server as already described in my Overview about the Flask web framework post.
Deploy python Web applications
In this section, I’ll like to describe the steps that are required to deploy a python Web application. You will see that the entire deployment process for python Web service involves many knobs. For this reason, I highly recommend to automate the entire process to avoid mistakes when deploying multiple instances. The last part of this post will discuss the automation using Ansible and a simple shell script.
To get the application working, you need to do the following steps:
Clone the source from the Github repository and create the user for the service
Prior starting with the deployment, we need to download the code from Github. The application should run in the /var/www/network_config_generator directory and should use the user ncg.
$ sudo adduser ncg --home /home/ncg
$ sudo adduser ncg sudo
$ sudo su ncg
$ sudo mkdir -p /var/www/network_config_generator
$ sudo chown ncg /var/www/network_config_generator
$ sudo chgrp ncg /var/www/network_config_generator
$ git clone https://github.com/hoelsner/network-config-generator.git /var/www/network_config_generator
Install the required packages using apt-get
Before we start with the configuration of the Web service, we need to install some packages using apt-get, including python 3, virtualenv, python pip, nginx and some development components:
$ sudo apt-get install python3.4 python3-pip build-essential python-dev python3-dev python-virtualenv nginxCreate a virtualenv and install the dependencies of the project
We will use a separate virtualenv for the Web page to have a defined python environment just with the packages that are required to run the Network Configuration Generator.
$ cd /var/www/network_config_generator
$ virtualenv /var/www/network_config_generator/venv -p python3.4
$ source venv/bin/activate
(venv) $ pip install -r requirements.txt
Create key-files (for CSRF protection)
The configuration of the application requires a random key for the CSRF protection. This key must be different on every deployment. For this reason, I wrote a simple create_key_file.py script that is located in the deploy/scripts directory. This script creates a random key and saves it in the network_config_generator.key file. We will use this key within the gunicorn configuration.
(venv) $ sudo -u ncg python3 deploy/scripts/create_key_file.pyCreate a service for gunicorn (using Upstart)
NGINX installs by default as a daemon, but we need to create an additional service for the gunicorn server. For Ubuntu 14.04, you’ll find an upstart script gunicorn.template.conf in the deploy/templates directory. This script starts the gunicorn server during the boot process of the linux server. Later versions of Ubuntu and some other Linux distributions are moving to systemd to start services during the boot process. I also added a systemd script gunicorn.template.service to the deploy/templates directory of the repository, if you like to install the application using another distribution. If you take a look at the script, you’ll note that we set some environment variables for the process to configure the Flask application. The first key instructs the application to use the “production config” and the second one defines the secret key for the CSRF protection. You need to overwrite this key within the the gunicorn script.
To accomplish the requirements from the last section, you need to execute the following commands:
(venv) $ SECRET_KEY=$(</var/www/network_config_generator/network_config_generator.key)
(venv) $ sudo -u ncg sed "s/SECRET_KEY_CONTENT/$SECRET_KEY/g" deploy/templates/gunicorn.template.conf | sudo tee /etc/init/gunicorn-network_config_generator.conf
Configure nginx
The nginx configuration is quite simple. You find a configuration template at deploy/templates/nginx.template.conf. It will configure the proxy to the unix:/tmp/network_config_generator.socket unix socket, which is also used in the gunicon configuration and an alias to serve the static files.
To configure nginx, just use the following commands:
(venv) $ sudo cp deploy/templates/nginx.template.conf /etc/nginx/sites-available/network_config_generator
(venv) $ sudo ln /etc/nginx/sites-available/network_config_generator /etc/nginx/sites-enabled/network_config_generator -s
Update the database schema
The Network Configuration Generator uses the SQLite database that is part of python, therefore no additional installation is required. The repository contains a short shell script that creates the database migrations and applies these to the database using the production configuration. It is currently required, because the migrations are no part of the repository
(venv) $ ./deploy/scripts/update_database.shStart the services
Now you can start the services using the following commands:
(venv) $ sudo service nginx restart
(venv) $ sudo start gunicorn-network_config_generator
Automate the deployment process using Ansible
As you can see, there are many knobs to press before the web service runs. For this reason, the repository contains a setup.yaml Ansible playbook in the deploy directory that accomplishes all these steps. Ansible is an agent-less configuration management tool to automate mainly server deployment and maintenance. You can read more about Ansible in the official documentation.
The Ansible playbook is quite easy to read. Within the playbook, you find the following task that installs the packages using apt:
  # install package dependencies
  - name: update apt cache
    apt: update_cache=yes cache_valid_time=10800
  - name: install packages
    apt: pkg={{ item }} state=installed
    with_items:
    - python3.4
    - python3-pip
    - build-essential
    - python-dev
    - python3-dev
    - python-virtualenv
    - nginx
Along with the Ansible playbook, the repository contains a setup.sh script, which ensures that Ansible is installed on the server, the code is located in the correct directory and the ncg user exists before executing the Ansible playbook.
Network Configuration Generator – Deployment Options
I considered multiple deployment options for the Network Configuration Generator as described in the initial use case for the Web service. These are
- Run it on a Ubuntu Server system (using an install script or Vagrant)
- Run it locally on you computer (without the entire NGINX/Gunicorn etc. Components, just the development server)
To setup the Network Configuration Generator on a Ubuntu 14.04 Server, you just need the following commands:
$ git clone https://github.com/hoelsner/network-config-generator.git network_config_generator
$ cd network_config_generator
$ ./setup.sh
I highly recommend that you use a separate server for the application, either a standalone Linux server or using Virtualbox and Vagrant (to stage a VM on your local VM). It doesn’t matter which option you choose from a setup perspective. Every script uses the Ansible playbook for deployment. Further details about the setup and installation steps are described in the readme file.
That’s it for today, thank you for reading.
Links within this post
- Kickstarting Flask on Ubuntu - Setup and Deployment (realpython.com)
- NGINX homepage
- gunicorn homepage
- Flask homepage
- python virtualenv documentation
- Official Ansible documentation
- Web Server Gateway Interface (Wikipedia)
- Unix Domain Sockets (Wikipedia)
- Systemd for Upstart Users (Ubuntu Wiki)