Using a Raspberry PI as a Configuration Generator
This post is part of the series “How to build your own Network Configuration Generator”. You find the overview about the entire series here. The last state of the code is available at the Network Configuration Generator GitHub repository.
This post discuss the first use case, where we provide the generated configurations “to the outside world”. I’ll like to show you today, how the Network Configuration Generator can be used on an “Appliance” to provide configurations using FTP and TFTP. You can use any hardware (or VM) that you like, but it must run some kind of Debian or Ubuntu Linux. In this post, I’ll use a Raspberry PI 2 Model B with a WLAN Dongle.
The entire code is available on the Network Configuration Generator GitHub repository. I created the tag “raspberrypi” on the repository. This tag shows the version that is discussed in this post.
Use Case: A Raspberry PI as a Provisioning Appliance
After my last post about the deployment of the Network Configuration Generator on a server, I had the idea of a small (mobile) provisioning gateway that can be used to stage devices wherever they are. A single board computer (SBC) like the Raspberry PI is perfect for such a use case. To improve the usability, I decided to add some Appliance specific functions to the web service. This includes for example the new Appliance Status page and the integrated FTP and TFTP server.
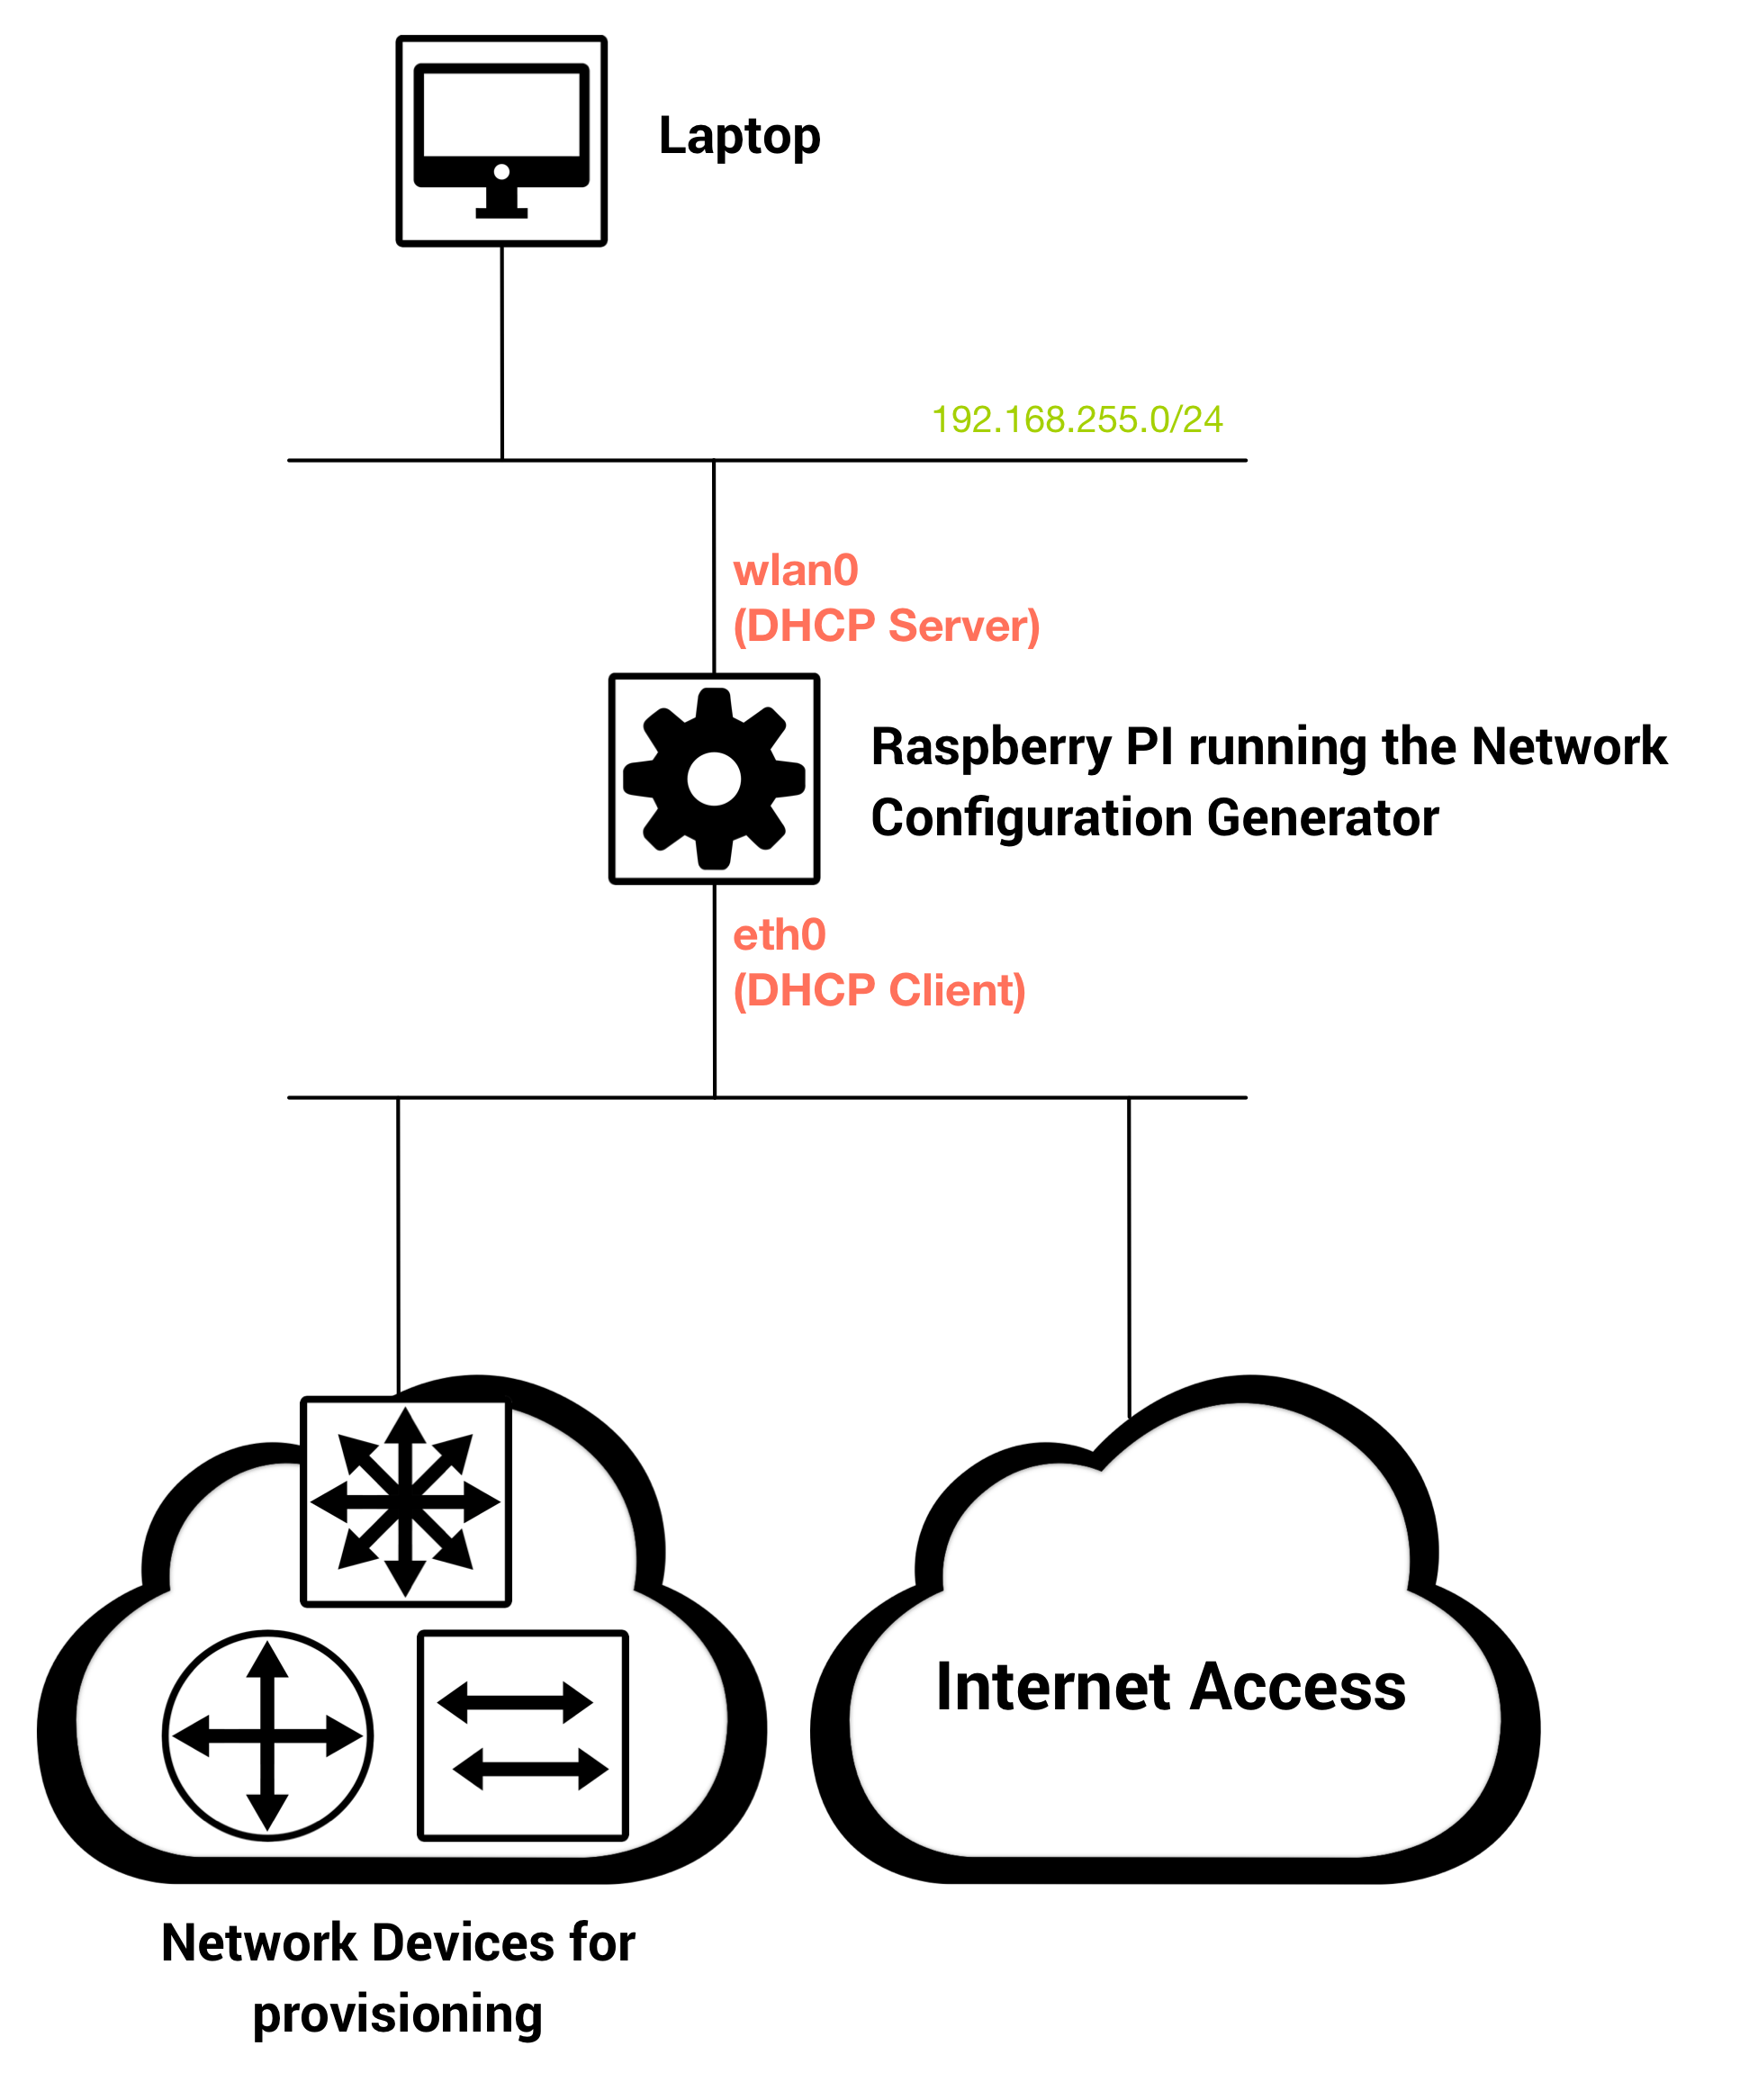
A Raspberry PI has only a single ethernet interface, therefore a WLAN dongle is added. The WLAN interface should act as an Access Point to provide access to the web service using a defined IP address. The ethernet interface is used to connect the devices that should be configured. The following diagram shows the use case.

That’s it. Now lets take a look what we need to accomplish the requirements:
- FTP server – using vsftp that is configured during the deployment
- TFTP server – using atftp that is also configured during the deployment
- Asynchronous Task Queue – required to push the configurations on the FTP/TFTP directory
- Shell in a Box – mainly for troubleshooting purpose and to configure the ethernet interface
The FTP user is always set to “ftpuser” and password is generated during the setup of the web service. You see the credentials in the export view on a Config Template.
❗Please Note: My current focus for this web service is the temporary use and/or use within a secure environment, therefore I don’t enable HTTPs or other secure transport protocols like SFTP. The use on an Internet facing interface is therefore not recommended.
The Network Configuration Generator on an Appliance
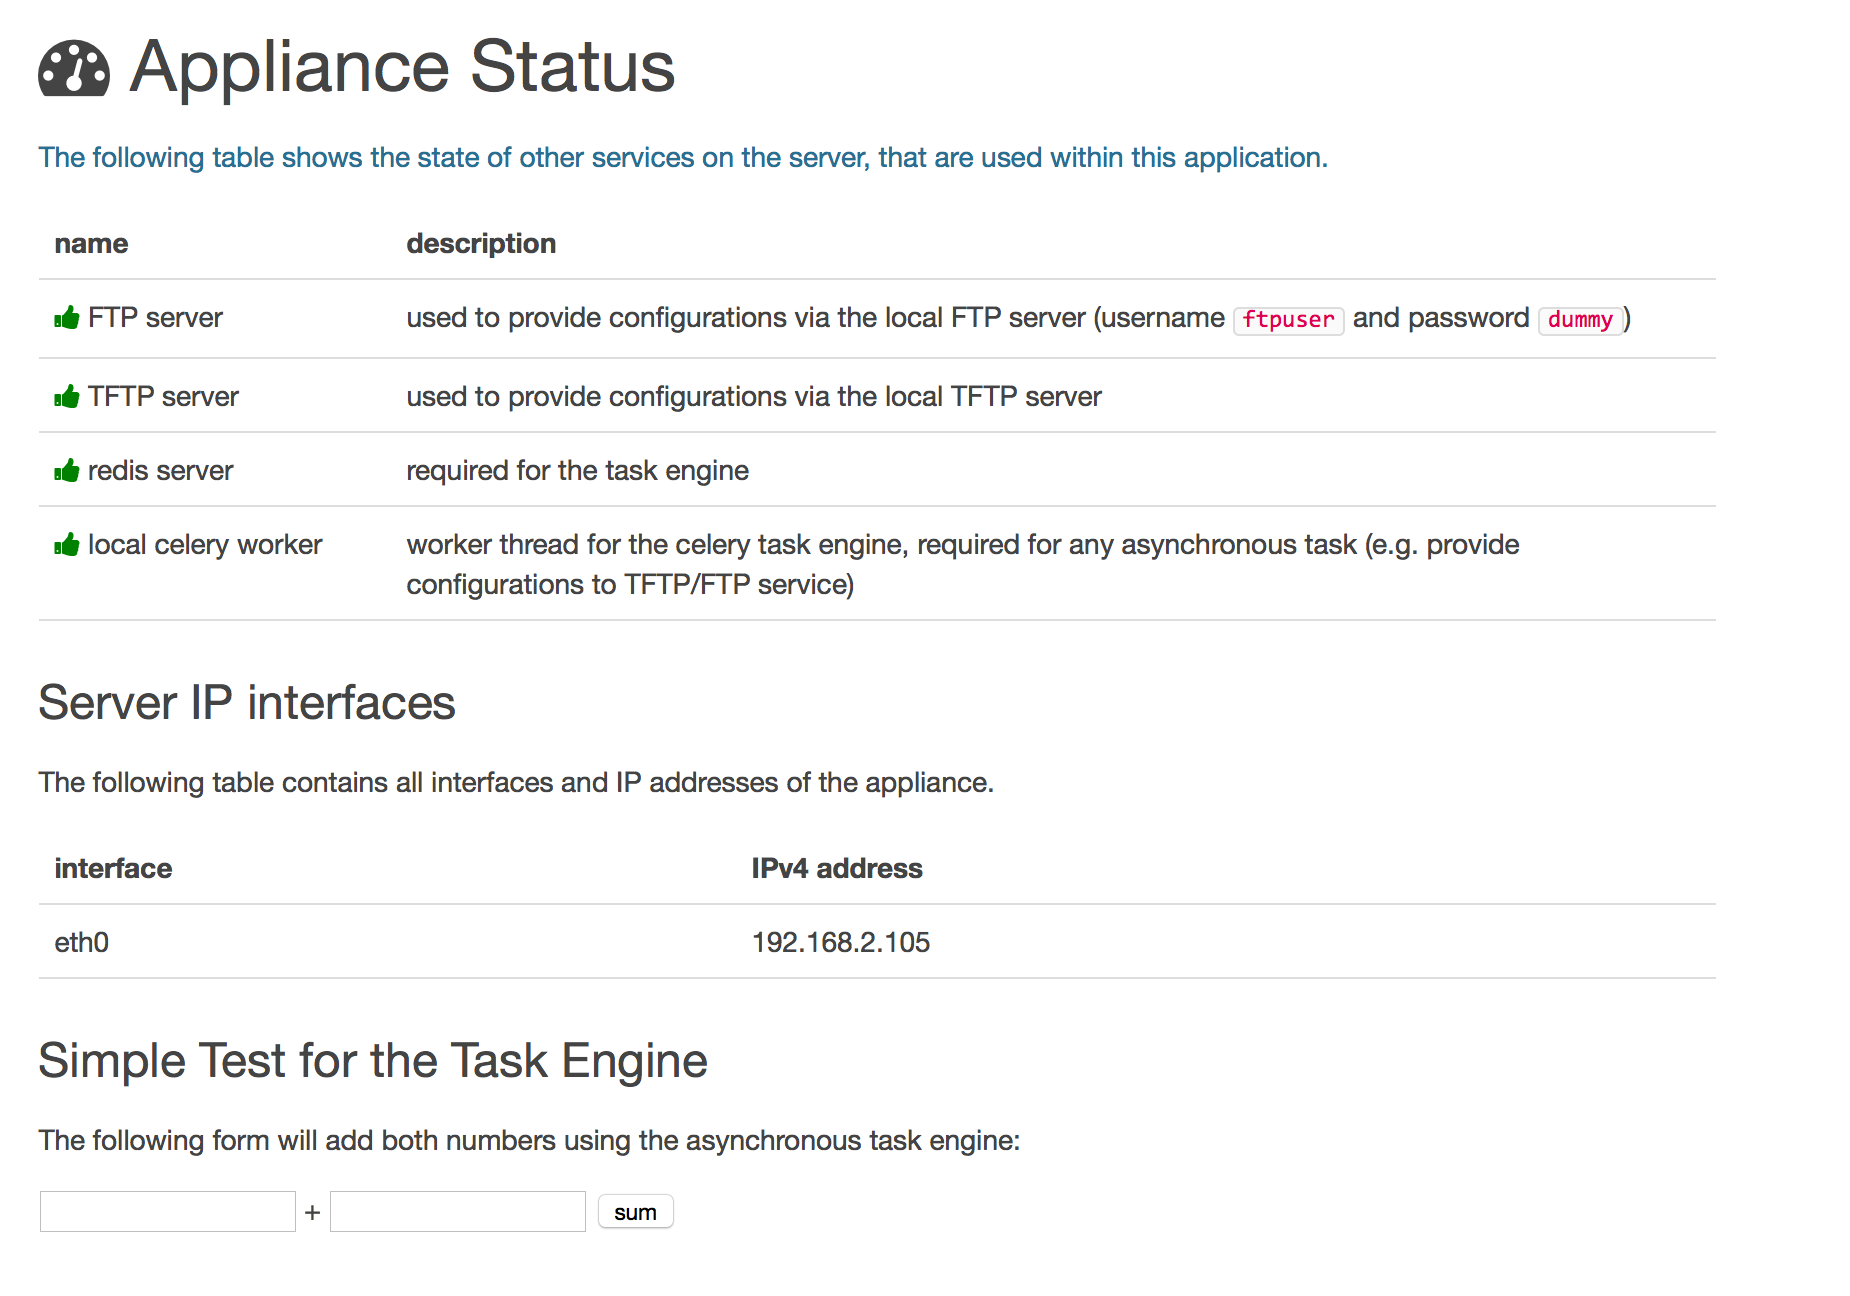
The initial development effort had the focus on local or a server deployment. When using an Appliance, I fast recognized that I need some additional features for troubleshooting and access to the underlying platform. For this reason the Appliance Status page was created. It shows the state of the services that are used for the Network Configuration Generator.
Furthermore, a Shell in a Box server is configured within the setup script to have some access to the underlying Linux system directly within the web application.
As you can see, we need a bit more than just the Flask library and some python “magic” to get the entire service running. I included all dependencies to the deployment script, therefore this is just for your reference. It should work out of the box after a successful installation process.
The Raspberry PI can run various Linux distributions as you might know. I decide to use the standard Raspbian distribution, which is based on Debian. This involves the use of some new components like systemd to get the background services working on the device.
Asynchronous Tasks for the Flask Web Application
If you have large Projects with many configurations, the export to the FTP/TFTP directories may take some time even if it runs locally. From a users perspective, a blocking HTTP call is not good (this means that the export to the directory happens as part of the HTTP request/response), because you don’t know what the server is doing. For this reason, I added a task queue based on Celery (worker) and Redis (broker). This task queue handles the export in a separate thread. The status of the task is shown in the user interface.
I won’t go into more details about this component or Celery itself, but if you’re interested in more details, please visit the Blog of Miguel Grinberg: Using Celery with Flask.
There is one drawback associated to this type of implementation: You cannot run the web service with all features using the run_local.py script. If you like to use the export functions, I’ll recommend to install the tool in a VM, on an RPI or a dedicated server, because you must run a Celery Worker thread and the Redis server. Otherwise it will simply not work.
Test Setup
I think you now got the idea around this use case, therefore lets take a look on my test setup. I used the following components:
- Raspberry PI 2 Model B
- Edimax EW-7811-Un WLAN Stick
- Battery Pack or Power Supply
Within the setup, I used the WLAN dongle as an Access-Point to have a direct connection to the web service with a static IP address. The ethernet interface is used for an internet connection during the setup and to deliver the configurations to the devices. If you need to reconfigure the ethernet interface with a static IP, just use the Shell in a Box service that is also part of the web service. The following diagram shows my test setup.
I updated the Raspberry PI to the last version using the following command:
$ rpi-updateAfter the reload, my RPI runs Version 4.1.17. Now you need to clone the sources from GitHub or copy the content of the repository to an USB stick. Within the root directory of the repository, you find a setup shell script for the Raspberry PI. Assuming that you are cloning the code from GitHub, simply use the following commands to start the installation:
$ git clone https://github.com/hoelsner/network-config-generator.git
$ cd network-config-generator
$ setup_raspberrypi.sh
The first setup script for Ubuntu is renamed to setup_ubuntu.sh. The setup script will install all requirements and creates a new user that is used to execute the services. After the installation, you can access the web service on port 80. To verify the state of the services on the server, just take a look on the Appliance Status page.
To configure your Raspberry PI as a WLAN Access Point, follow the blog post Setting Up WiFi Access Point with Edimax EW-7811UN on Raspberry Pi on https://ariandy1.wordpress.com. It was very helpful for me.
Conclusion
Okay, that’s it for today. I think this is a nice tool if you need to do some onsite provisioning work. I hope you found this post helpful and you got the chance to test the web service using the code on GitHub. Again, you can also deploy the Network Configuration Generator along with the FTP and TFTP server on a regular Ubuntu Server. If you have any feedback, detect some issues or have ideas for further development, please leave a comment below.
That’s it for this week. Thank you for reading.
Links within this post and further reading
- Raspberry PI 2 Model B
- vsftp (Homepage)
- atftp (manpage)
- Shell in a Box (Unofficial GitHub fork)
- systemd (Wikipedia)
- Celery: Distributed Task Queue (Homepage)
- Redis (Homepage)
- Using Celery with Flask (Miguel Grinberg's Blog)
- Systemd for Upstart users (Ubuntu Wiki)
- Setting Up WiFi Access Point with Edimax EW-7811UN on Raspberry Pi (ariandy1.wordpress.com)