Invoke – a task execution tool
Update 14th April 2022: Updated broken link to the Ansible Getting Started guide/chapter.
I found a nice link in the python weekly newsletter from last week (number 249), which was titled “Automation for the People“. It was a short GitHub gist created by Curtis Lassam who wrote about his journey in “automate all the things”… He wrote about a lot of automation approaches and frameworks and his experience with them, including Ansible. Almost at the end of the article, he wrote:
“But one problem that Ansible doesn’t solve? It’s not a very good task runner.”
and I also see the same issue as he does… Ansible is good for automation but bad when you need to execute them… At the end of the article, he mentioned a python library called invoke that provides a a simple task runner. This made me curious.
As you can see in some of my GitHub projects (e.g. the Product Database), I use in many cases Ansible to stage an application on a server. I won’t change the use of Ansible at all, but I like to find a better way to execute them. Before diving into the new solution using invoke, lets have a look how it works today.
Today’s staging approach - shell scripting…
Before continue reading, I recommend that you have at least a basic understanding of Ansible. If not, take a look on the Getting Started chapter in the Ansible documentation. If you just like to read about a nice library to run tasks using python, continue with the next section and ignore the Ansible specific part 😄.
In most of my projects (especially the Product Database), you’ll find a deploy directory that includes some stage_ directories. These directories are used for the deployment and contain the following files:
- the Ansible playbook – that is mainly used to defines the variables that are required for the deployment (it includes another setup deployment that defines the steps for provisioning)
- custom Ansible inventory – it contains the server(s) that I like to use for deployment (using a “staging” group)
- shell script to trigger Ansible playbook along with the custom inventory
Okay, long story short: The shell script in the deploy directory contains normally only the following command (along with some echo-commands etc.):
$ ansible-playbook stage-machine.yaml --inventory-file=ansible-inventory --ask-pass --ask-sudo-passNow you can see why I fully agree with the article of Curtis, Ansible solves a lot problems, but it is no good task runner… As you can see, I add by default the --ask-pass and --ask-sudo-pass parameter. They are required if you use password-based authentication.
What is invoke?
This library is a simple python-based task runner. I fast see some use cases for my daily work and therefore I want to share a short intro about the library with you. Invoke can be installed (as almost everything) from PyPI:
$ pip install invokeAfter you installed the library, you just need to create a tasks.py file in the directory, where you want to run the commands that are defined using invoke.
How to use?
After you created the tasks.py file, you simply need to add python functions and annotate them with a @task decorator from the invoke library. The following code example show a basic skeleton how to define an invoke task named build:
from invoke import task

@task
def build(ctx):
    print("build task")
That’s it. Now you can run the command Invoke following the task name in the directory where your tasks.py is located.

Invoke also simplifies the handling of command line parameters. If you need to add a parameter to a custom function, just add a parameter to the python function:
from invoke import task

@task
def hello(ctx, name):
    """A simple hello function that echoed the given name."""
    print("Hello %s" % name)
Invoke will check that all parameters are provided by the user. If not, it will throw an error. You can also define default values as you would do within python functions. If we run the very basic example, it should look similar to the following output:
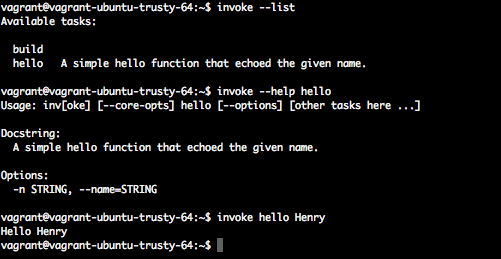
Furthermore, invoke includes some helpful functions if your tasks.py becomes larger, e.g. a --list parameter to show all available commands or a --help <command> parameter, to show a detailed help. They are automatically generated using the python doc-string. If you like to customize them, you need to add a help parameter to the @task decorator.
I played a little with the library and found some quite useful features, e.g.
- pre- and post-execution tasks
- configuration files
- automatically responding to program output – http://docs.pyinvoke.org/en/0.13.0/concepts/responses.html
I won’t go into more details at this point, but I can recommend a closer look at the official documentation for more detailed information.
New staging approach using invoke
Now lets have a look how the Ansible execution issue is fixed within the Product Database. I decide to create an invoke tasks.py file that replaces the shell script and the static Ansible inventory within the deployment templates (the deploy/stage_ directory). With the recent added script, it’s now possible to create a new Product Database server with the following command:
$ cd deploy/stage_default
$ invoke deploy <server-ip-or-hostname> -u <username> [-p <password>]
The deploy task will automatically create a custom Ansible Inventory and executes the playbook on the target machine. Furthermore, I add a deploy_local task that executes the Ansible playbook on the localhost. I also added a new stage_default directory that contains a default configuration to get the Product Database up and running. You can use it without any further modification (except you need the LDAP authentication). Further details about the deployment dependencies are available in the Product Database readme file on GitHub.
I think this simplifies the deployment process a lot.
Conclusion
You may wonder if this is useful or not and where is the difference compared to a shell script within the directory. From my perspective, it’s easier to use and easier to maintain. I may extend the invoke tasks file from the Product Database in the future, e.g. adding an interactive setup process where you can define the installation options on the fly.
For me, Invoke is a nice tool, not only for the Product Database and I’ll continue using it. That’s it for today, thank you for reading.