Introduction to the python ipaddress module
Today I’d like to show you a quick introduction to the ipaddress module that is part of the python 3. The code examples are expressed in a Jupyter notebook, as already announced in my last post.
I added two new files under the notebook directory from the python examples repository: one that works with IPv4 and one that works with IPv6 networks. They are located in the notebook directory. I assume that you are familiar with the IP protocol, before reading this post. At the end of this post, I’ll provide a link to the Jupyter notebook viewer for the notebooks that I created during this post.
the python ipaddress module
The ipaddress module was introduced to the python language starting with version 3.3. This module simplifies the work with IPv4 and IPv6 addresses in python. Within the Jupyter notebook, we will work primarily with the following three class types:
IPv4Address– represents a single IPv4 addressIPv4Network– represents a IPv4 networkIPv4Interface– represents a IPv4 interface
As the name implies, the classes represent a IPv4 address or network. If you need IPv6, just change the name of the class. To create these objects in python, the module provides some basic factory functions to create such objects:
import ipaddress

ipaddress.ip_address(string)
ipaddress.ip_network(string)
ipaddress.ip_interface(string)
These factory methods will identify which version of the IP protocol is used and will respond with the appropriate version. You can also pass integers/binary strings to the factory functions or the classes as an alternative, but I think this is more difficult to read within the python code, therefore I’ll skip this option.
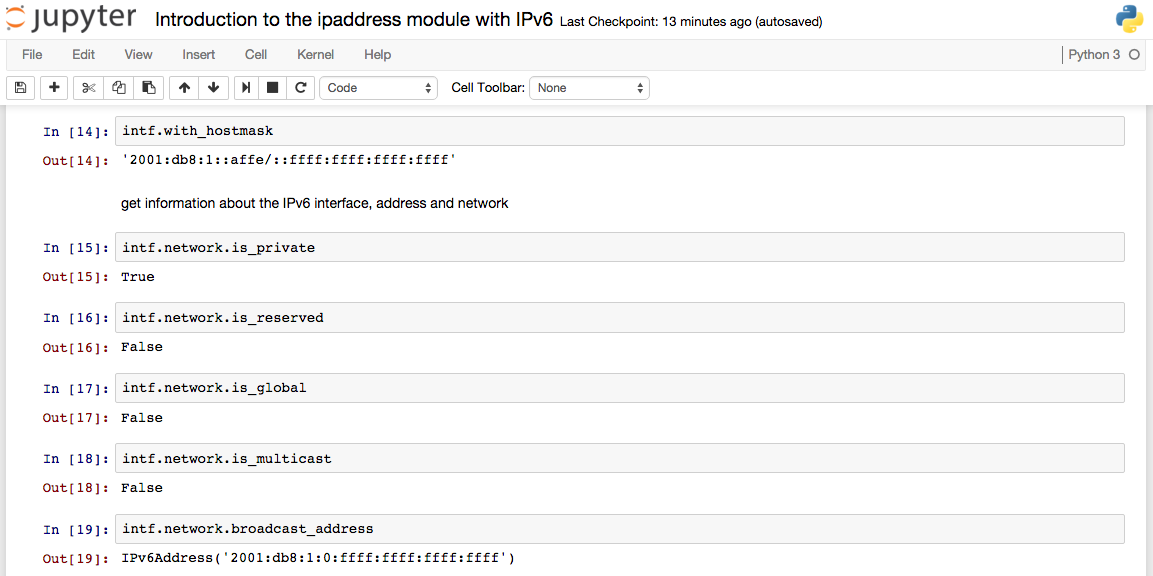
After you create an IPv4/IPv6 object, you can get many information out of the class, for example: is it a multicast address or a private address, the prefix length and netmask etc. You can see some of these methods on the following screenshot:

You might see some uncommon representations, e.g. when displaying an IPv6 address with a netmask (I’ve never seen this representation before I played with the ipaddress module). Furthermore, there are some misleading names of some functions, especially the broadcast_address associated with the IPv6 classes. By definition, there is no broadcast within the IPv6 address space.
One really good function within the IPv6 classes is the ability to explode or compress an IPv6 addresses, as you can see in the following screenshot.

Subnetting with the ipaddress module
I think you have now an idea how to work with this objects and classes from the module. Now lets have a look at a more practical topic: subnetting. The module provides a set of useful functions:
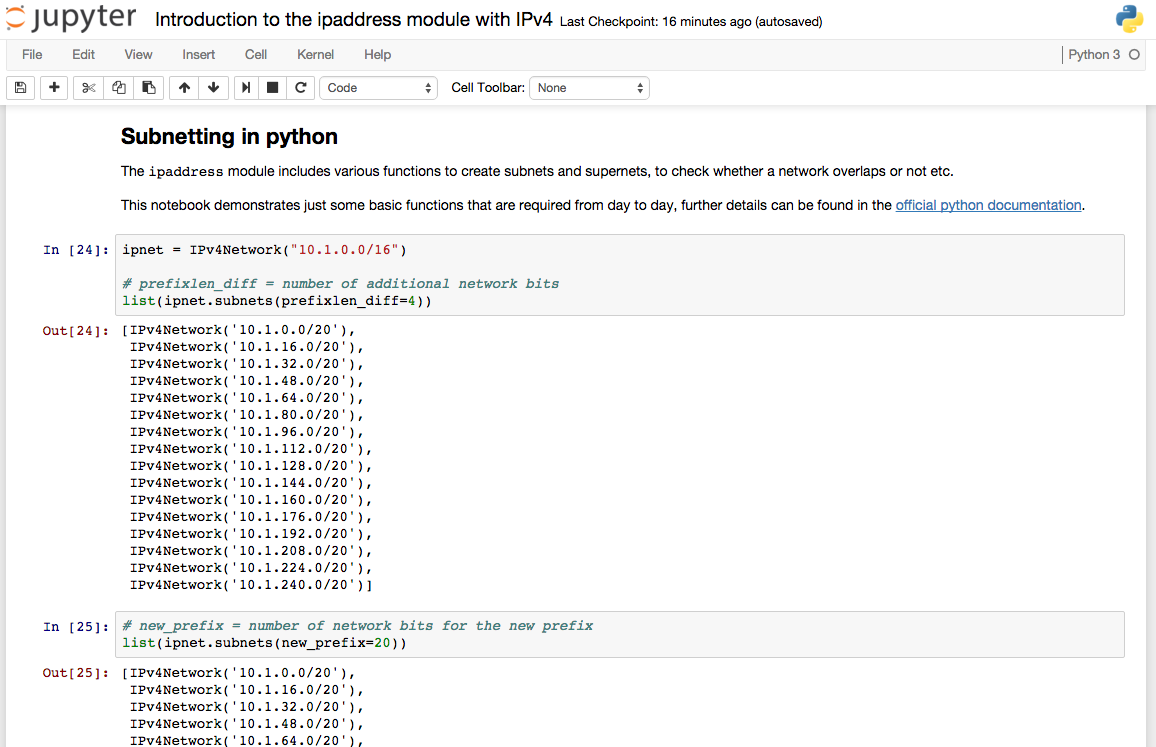
address_exclude(network)– compute the network definitions resulting from removing the given networkoverlaps(other)– check, whether a given subnet is part of another onesubnets(prefixlen_diff=1, new_prefix=None)– generate subnets with additional host bits or with a specific amount of network bits
The following screenshot shows the usage of the subnets function.

Conclusion
As you can see, python 3 provides you an easy to use library when working with IP objects. It is very useful if you need to verify IP addresses within your python script or if you need to convert values related to IP addresses and networks, for example if the subnetmask should be converted from a number of network bits to a decimal representation. Another use case is an IP subnetting application, that gives you the required IP subnets based on required network size or amount of networks per location (I was too lazy to use this as an example ;)).
Thanks for reading.
Links within this post
- Introduction to the ipaddress module with IPv4 (Notebook on GitHub)
- Introduction to the ipaddress module with IPv6 (Notebook on GitHub)
- official python 3 documentation - IPv4/IPv6 manipulation library
- official python 3 documentation - An introduction to the ipaddress module
