Automate SSH connections with netmiko
Today, I like to show you an example how to automate SSH connections with netmiko. To demonstrate it, I decide to create a simple CDP information crawler. The result should be a basic network diagram based on HTML and Javascript. As you might know, this involve more components than just netmiko. It is used to collect the information from the device using SSH. To parse the output from the device, we will use TextFSM. For the visualization, we will use some HTML, Javascript and CSS.
I add the example code that I’ve created for this post to my python script examples repository on GitHub. You find the code in the automate-ssh-with-netmiko directory.
Automate SSH connections using netmiko
Last year when I started with python programming and network automation, I tried to implement a little helper to automate the interaction with network devices using SSH based on the paramiko library. After some effort, I stopped working on it due to some time limitations. Later on I thought about a restart, but then I found an interesting alternative (or extension) to paramiko: netmiko. This library is created and maintained by Kirk Byers since late 2014. It provides a simplified version of paramiko to interact with network devices.
At time of this writing the library has a broad support of vendors and operation systems, including Cisco IOS, NX-OS, HP ProCurve and Juniper Junos. For Cisco NX-OS, I’ll prefer in newer software version the Cisco NX-API. I wrote about this topic in the post about the Cisco NX-API on Nexus 5500. Netmiko focuses on legacy devices, where SSH scraping is required to get some form of programmatic interaction.
Today, I’ll use this library to collect the CDP information from a Cisco catalyst switch. After the data collection, we will use TextFSM to parse the output and create a JSON data structure that describes the associated devices. This data structure is used with vis.js, a visualization library based on Javascript and CSS.
Collect the CDP information using Netmiko
Within the example script, you’ll find a function that collects the CDP information from a given Cisco switch using netmiko. This function looks similar to the following snippet:
def get_cdp_neighbor_details(ip, username, password, enable_secret):
    """
    get the CDP neighbor detail from the given device using SSH

    :param ip: IP address of the device
    :param username: username used for the authentication
    :param password: password used for the authentication
    :param enable_secret: enable secret
    :return:
    """
    # establish a connection to the device
    ssh_connection = ConnectHandler(
        device_type='cisco_ios',
        ip=ip,
        username=username,
        password=password,
        secret=enable_secret
    )

    # enter enable mode
    ssh_connection.enable()

    # prepend the command prompt to the result (used to identify the local host)
    result = ssh_connection.find_prompt() + "\n"

    # execute the show cdp neighbor detail command
    # we increase the delay_factor for this command, because it take some time if many devices are seen by CDP
    result += ssh_connection.send_command("show cdp neighbor detail", delay_factor=2)

    # close SSH connection
    ssh_connection.disconnect()

    return result
As you can see, the code is quite easy to read if you’re familiar with the configuration of Cisco IOS devices. Kirk Byers has done a fantastic job to make this library accessible for Network Engineers. If you want to dive deeper into netmiko, please take a look at his post about the netmiko library.
Parse the results using TextFSM
I already wrote about TextFSM in the past, therefore I won’t go into many details about the library. You can read an introduction about it on my blog post about the parsing of CLI outputs with TextFSM.
Compared to my fist post, the parsing template is this time more complicated. We will use the following additional states (not only Start):
ParseIP– get the first IP address from the CDP entry addressesGetVersion– add the first line after theVersion :string to the version variable
To move to another state, just use the -> characters following the name of the new state. The new state is used until another match on a rule with a state transition occurs. The resulting TextFSM template looks similar to the following.
Value Filldown local_host (\S+)
Value Required dest_host (\S+)
Value mgmt_ip (.*)
Value platform (.*)
Value remote_port (.*)
Value local_port (.*)
Value version (.*)

Start
  ^${local_host}[>#].*
  ^Device ID: ${dest_host}
  ^Entry address\(es\): -> ParseIP
  ^Platform: ${platform},
  ^Interface: ${remote_port},  Port ID \(outgoing port\): ${local_port}
  ^Version : -> GetVersion

ParseIP
  ^.*IP address: ${mgmt_ip} -> Start

GetVersion
  ^${version} -> Record Start
Visualize the results using HTML
This part is more or less the result of some research from the last weeks, because I searched a simple and fast solution to visualize network topology data within a web application. At first, I take a look at the D3 and the Cisco NeXt UI toolkit. D3 has a quite high learning curve to create a network that includes some kind of hierarchy and it requires a huge amount of customization before I got a (not so useful) result. The Cisco NeXt UI looks promising, but the documentation needs some improvement from my point of view. Furthermore, there is no easy way to download a distribution version for it (no bower file, no distribution package/directory in the
Cisco NeXt GitHub repository). It has some potential, but I required a small and easy library to get some quick results.
After some googling, I found a useful GitHub.io page about graph drawing libraries and I finally found vis.js.
Vis.js is quite easy to use from what I’ve seen so far. The following screenshot was the result of some reading through the tutorials.
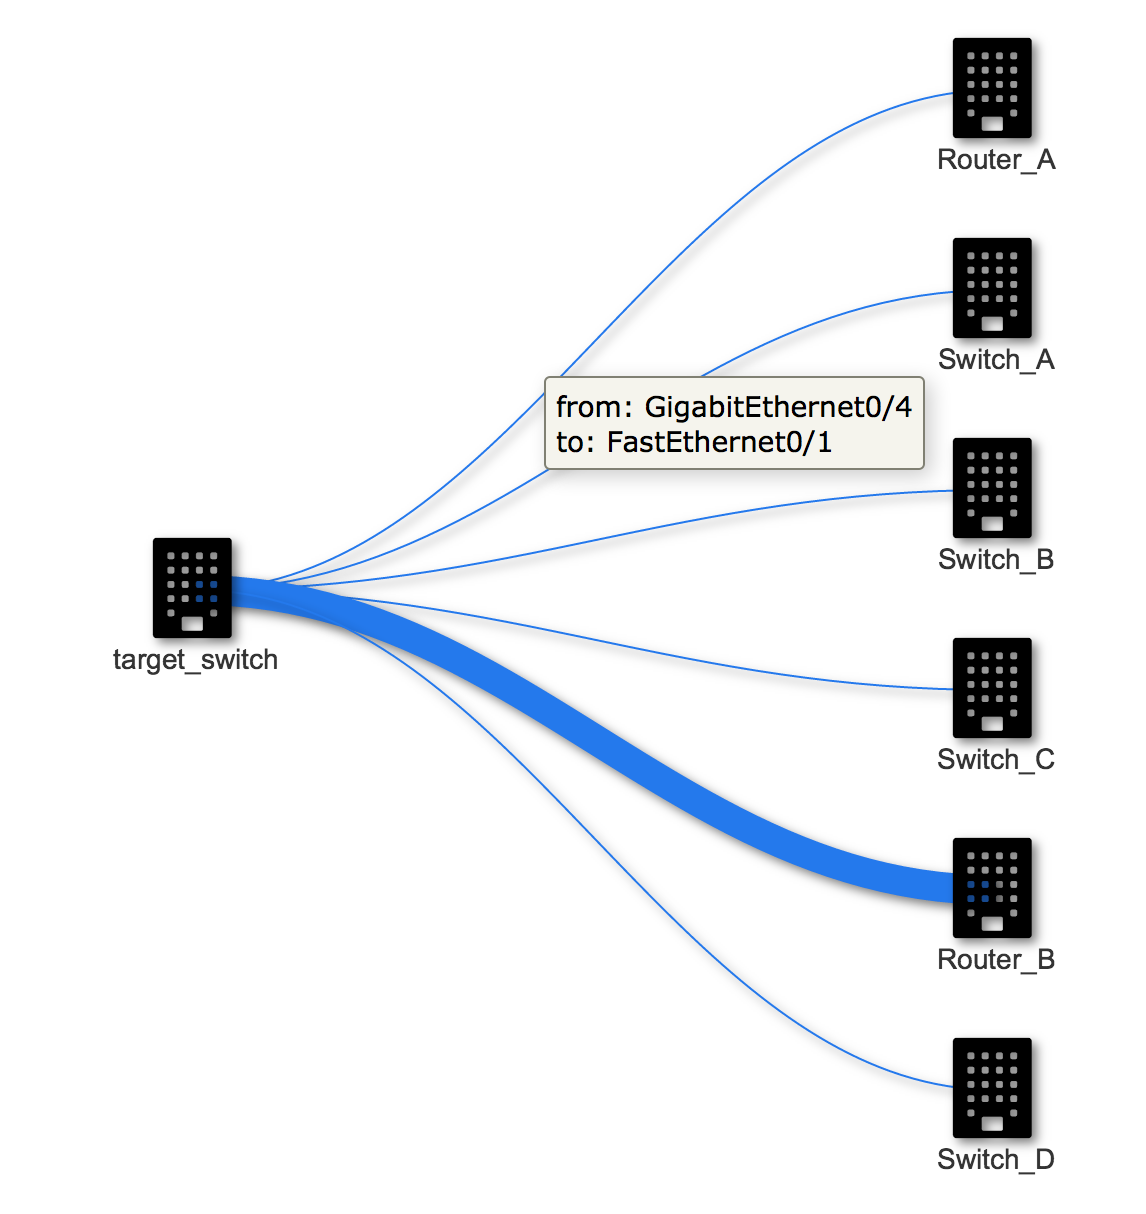
If you have a basic understanding of HTML and Javascript, the example page within the repository should be easy to understand. If you like to get some impression about the possible network diagrams with vis.js, take a look at the network examples in the documentation. The required library is loaded from a CDN, therefore you don’t need to download any additional dependencies and can use it out of the box.
Conclusion
That’s it for today. I know that this post contains some topics and is a bit hard, but my primary goal was to demonstrate the quick steps to get information from your current infrastructure and to work with them. I hope you try the example from the python script examples repository on GitHub. You can also try to extend the functionality of this small script, e.g. to get also the information from the discovered devices and merge them into the diagram to get a tree view. It’s not that hard as it sounds.
If you have comments and feedback about this little script and/or the post, please leave a comment below. Thank you for reading.
Links within this post
- Netmiko on Kirk Byers blog
- Netmiko on GitHub
- TextFSM (Google Code)
- Python3 compatible fork of TextFSM from Jonathan Slenders
- vis.js homepage
- vis.js on GitHub