Remote Access Use-Cases with WireGuard

Some months ago, I played with various VPN technologies, including WireGuard. Today I’d like to discuss two Use-Cases for such a VPN together with the problems that I face during the deployment. Especially, a partial mesh deployment with automatic client failover won’t work out of the box without further extensions (or manual work).
For this reason, I’ve developed a small utility which is available on my GitHub page that solved two problems for me: It allows the configuration of WireGuard via a REST API and implements the required capabilities to get WireGuard working within a partial mesh deployment including a client failover scenario. As always, the utility is at the time of this writing a prototype that you can use without any warranty. If you have additional ideas/feedback or if you find issues with the tool, please use the GitHub issues page of the project.
Before we dive into the details of the Use-Cases, let’s have a brief look at the fundamentals.
What is WireGuard?
WireGuard is basically a connection-less UDP based VPN protocol to interconnect devices across a public or untrusted network. It provides a data plane, but there are several drawbacks associated to the current implementation: At the time of this writing, you cannot use dynamic IPv4/IPv6 addresses on the tunnel interfaces.1 Therefore, you need some kind of IP address management for the clients/networks that you want to interconnect. In addition, WireGuard implements no automatic mechanism to exchange the public keys. This must be done manually outside Wireguard.
Even though, it’s in summary easier to configure and faster compared to alternative protocols like IPsec/OpenVPN. It is also part of the Linux Kernel >=5.6, which makes it even easier to deploy, and there are a ton of client implementations available on the homepage.
You can get further information about the protocol, internals and also limitations of WireGuard at the following sites:
- Donenfeld (2017), "WireGuard: Next Generation Kernel Network Tunnel"
- WireGuard Homepage
- Protocol and Cryptography details on WireGuard
- Known limitations of WireGuard
There are also some concerns/drawbacks regarding the user privacy as mentioned here (which also contains a good summary of the pro and cons of WireGuard) and the monitoring and observability capabilities out of the box.
Anyway, WireGuard was for my Use-Case a good choice to create a VPN, so I decided to dig deeper into it.
What I want to achieve - requirements and constraints
In my case, I like to deploy WireGuard as a VPN solution to provide access to a set of containers on multiple servers using IPv4 and IPv6. A basic packet filtering and NAT should be provided on the servers. Initially, a standalone Docker Engine for the WireGuard hub endpoint and the services is deployed. The clients are onboarded in a Hub-and-Spoke Setup.
Later on, I want to deploy additional (probably temporary) hubs that should be interconnected to the existing hub (as full mesh). Because of the static configuration of the existing clients, the hub endpoint should route between each other to provide connectivity. Furthermore, it should be possible to add additional tunnels from the clients directly to the other hubs to reduce the latency when accessing the services. In case that the connection to the other hub is interrupted (or misconfigured), the access should be possible via the permanent hub. This Use-Case is called “Partial Mesh with Client Failover” within the article.
The following diagrams illustrate the two Use-Cases together with the private IP addresses that used within the following examples.

Later on, more advanced hosting mechanism for the containers e.g., via Kubernetes should be provided, but the two mentioned Use-Cases should be enough for a prototype implementation.
WireGuard in Docker Containers
Because WireGuard influences the routing table of the system, it requires root privileges on the system. For this reason, you need to add the NET_ADMIN capability to the container to allow the creation or removal of new virtual interfaces on the system (see Runtime privilege and Linux capabilities from the Docker Documentation) for example.
Furthermore, the container should act as a Router and should support IPv6. The IPv6 support is only required on the host system, and we will connect the tunnel via IPv4 and tunnel IPv6 over it within the prototype implementation. The Docker Engine itself does not need to be enabled for IPv6, as mentioned at Enable IPv6 support (Docker Documentation).
The following kernel parameters must be used for a container that should configure WireGuard:
--sysctl net.ipv4.ip_forward=1 \
--sysctl net.ipv4.conf.all.src_valid_mark=1 \
--sysctl net.ipv6.conf.all.forwarding=1 \
--sysctl net.ipv6.conf.all.disable_ipv6=0 \
That’s all. Now we can start to configure WireGuard.
Hub-and-Spoke Use-Case – or the easy part
Please note: I will go through the setup step by step for the Hub-and-Spoke Use-Case. The full
Dockerfileand adocker-compose.ymlis available as GitHub Gist.
Before we create the WireGuard hub container, we need to create a network within the Docker Engine where the service containers are running. Because WireGuard works with static IPv4/IPv6 addresses, we must define the IP addresses statically that are used within the internal network. For the example, I use 172.29.0.0/28 and FD00::0:0/112 (to keep it short in the explanation, I’ll use just addresses from FD00::/48)2.
The use of the static addresses affects the scaling of the scenario. For me, that was the reason to plan for a dual-stack IP implementation to scale, at least with IPv6 only.
To create the network in docker, use the following command:
user@hub-host$ docker network create --ipv6 \
  --subnet=172.29.0.0/28 \
  --gateway=172.29.0.1 \
  --subnet=FD00::0:0/112 \
  --gateway=FD00::0:EEEE \
  wg_internal
Within this network, we need a test service to verify the reachability of the WireGuard Clients and the function of the container. For this, we will use the container nginxdemos/nginx-hello, and it is started using the following command:
user@hub-host$ docker run -d --name wg-service-03 --rm \
  --network wg-internal \
  --ip=172.29.0.3 \
  --ip6=FD00::0:3 \
  nginxdemos/nginx-hello:latest
Because of the missing DNS resolution for the clients (at least in this setup), it’s recommended to specify an IP address during startup. As an alternative, you can use docker inspect to see the IP addresses.
Now we can start a container on the Hub with the following command. We will do now anything manually, and therefore the container should just wait forever:
user@hub-host$ docker run -d -it --name hub \
  --cap-add=NET_ADMIN \
  -p 51820:51820/udp \
  --network wg_internal \
  --sysctl net.ipv4.ip_forward=1 \
  --sysctl net.ipv4.conf.all.src_valid_mark=1 \
  --sysctl net.ipv6.conf.all.forwarding=1 \
  --sysctl net.ipv6.conf.all.disable_ipv6=0 \
  ubuntu:20.04 \
  sleep infinity

# open a bash inside the container
user@hub-host$ docker exec -it hub /bin/bash
Within this container, you need to install the following packets (WireGuard and some utilities for monitoring and troubleshooting):
root@hub$ apt-get update && apt-get install -y wireguard wireguard-tools iproute2 iputils-ping inetutils-traceroute iptables
Please note: As part of this guide, I’ll use some randomly generated private keys for my personal documentation. It will work with this when you try to configure WireGuard, but you must definitively change them 😉 You can generate new private keys with the command
wg genkeyand Pre-Shared Keys withwg genpsk.
To get WireGuard working on the hub, we will now do the following:
- create a configuration file for WireGuard at
/etc/wireguard/wg16.conf - enable the WireGuard interface using
wg-quick
root@hub$ cat <<EOF > /etc/wireguard/wg16.conf
[Interface]
# IPv4/IPv6 addresses of the wireguard endpoint
Address = 172.29.1.1/32, FD00:1::1/128
# Port where you should accept wireguard connections
ListenPort = 51820
# private key of the endpoint (should be hidden normally)
PrivateKey = 4PSSsNFfYpqzJ3thGCeHd8pZWkZVdoJbm2G7oiA6TmQ=

# enable NAT for IPv4 if tunnel is active
PostUp =   iptables -t nat -A POSTROUTING -o eth0 -j MASQUERADE
PostDown = iptables -t nat -D POSTROUTING -o eth0 -j MASQUERADE

# enable NAT for IPv6 if tunnel is active
PostUp =   ip6tables -t nat -A POSTROUTING -o eth0 -j MASQUERADE
PostDown = ip6tables -t nat -D POSTROUTING -o eth0 -j MASQUERADE

# Peer statements
[Peer]
PublicKey = s5WDa5TV/DeXYLQZfXG4RD1/eGPt2rkDMGB1Z379ZQs=
# please note that the PSK is optional and can be different per peer
PresharedKey = V4x0/xBvGj4/vAo7UIA5kYOMwvppI45lVgmAiiIhRaQ=
AllowedIPs = 172.29.1.16/32, FD00:1::16/128
EOF

root@hub$ wg-quick up wg16
That’s it. Now you can download and install a WireGuard client from the Homepage and create a tunnel with the following configuration:
[Interface]
PrivateKey = sJVz9zldsUb48AtGULMRPTNTF0UfX+XF2AHKtopYLlU=
Address = 172.29.1.16/32, fd00:1::16/128

[Peer]
PublicKey = yx0owjK+RWUD3ccSDBus7PA/B+WuVhSYUmEO9XAil0k=
PresharedKey = V4x0/xBvGj4/vAo7UIA5kYOMwvppI45lVgmAiiIhRaQ=
AllowedIPs = 172.29.0.0/28, 172.29.1.0/28, fd00::/112, fd00:1::/112
Endpoint = 127.0.0.1:51820
PersistentKeepalive = 25
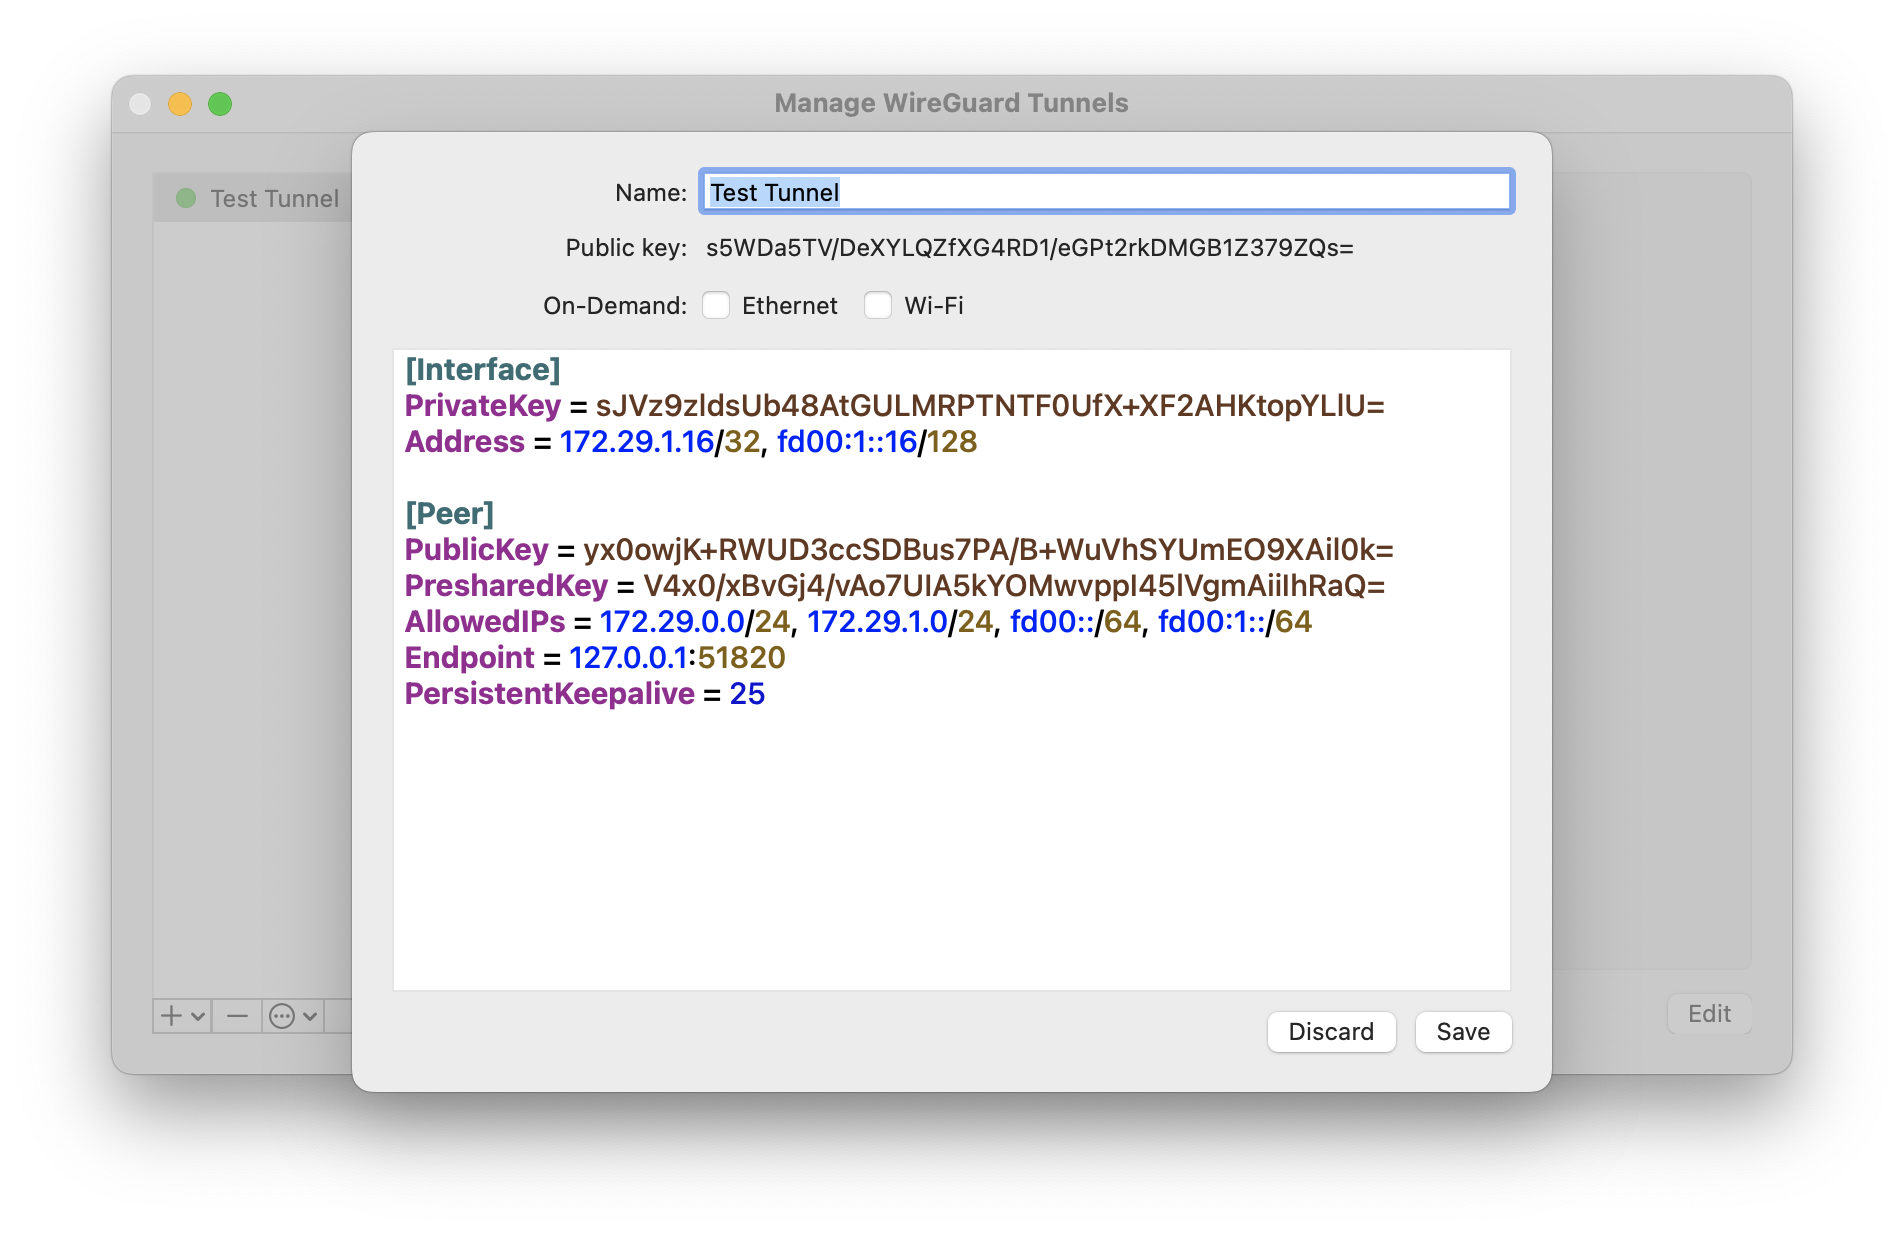
You see that the tunnel is active if you see a successful handshake.

You can verify the connectivity by accessing http://172.29.0.3:8080/ and should see a site similar to the following screenshot.

That’s it. The Hub-and-Spoke scenario is fairly straightforward to set up and use. The next section deals with the more complex scenario.
Partial Mesh with Client Failover – The tricky part
This is basically just an extension of the Hub-and-Spoke Use-Case from the last section. The interconnection between the hub containers should use a separate WireGuard interface on the servers to avoid any conflicts with the packet filter rules. We extend the Hub-and-Spoke Use-Case now as shown in the following diagram.

Furthermore, we change the configuration of the client to allow all networks via the permanent hub – in case of the example it will be AllowedIPs = 172.29.0.0/24 fd00::/64. For the direct connections to the other hubs, the AllowedIPs statement just contains the more specific IP subnets (/28 in the example configuration below). The client configuration then looks similar to the following snippet:
[Interface]
PrivateKey = sJVz9zldsUb48AtGULMRPTNTF0UfX+XF2AHKtopYLlU=
Address = 172.29.1.16/32, fd00:1::16/128

[Peer]
PublicKey = yx0owjK+RWUD3ccSDBus7PA/B+WuVhSYUmEO9XAil0k=
PresharedKey = V4x0/xBvGj4/vAo7UIA5kYOMwvppI45lVgmAiiIhRaQ=
AllowedIPs = 172.29.0.0/24, fd00::/64
Endpoint = 127.0.0.1:51820
PersistentKeepalive = 25

[Peer]
PublicKey = KMFZz2cUuQx0Equ6ITTJOTt1qB/WFR8C/Yw7oYXsSAE=
PresharedKey = V4x0/xBvGj4/vAo7UIA5kYOMwvppI45lVgmAiiIhRaQ=
AllowedIPs = 172.29.0.16/28, fd00::1:0/112
Endpoint = 127.0.0.1:51821
PersistentKeepalive = 25
This scenario has one challenge: as long as the client and hub configuration matches, everything will work as expected. The problems arise if you enter a failed condition, e.g. an interface on the client goes down or is misconfigured (remember the temporary hubs that I’ve mentioned at the beginning?). Consider the following scenario:

In this case, Client 1 can reach the B services via hub A, but Client 2 will not. This behavior occurs because wq-quick adds a static route to the routing table by default when the configuration is applied. This happens regardless of the connection state of the WireGuard endpoint.3 You can change this behavior using Table = off in the WireGuard configuration. Furthermore, WireGuard tracks no tunnel state because it’s connectionless… In this case, WireGuard will never alter the host routing table, and you need to do this manually or in a separate process.
At this point, you have no chance to recover the connectivity without modifying the configuration or routing table manually. At this point, I decided to create a utility for Wireguard to solve these issues.
WireGuard Container Endpoint Prototype
In summary, the prototype implementation should solve the dynamic configuration of the routes based on the state of the tunnel. To identify that a tunnel is active, we can check the “latest handshake” value provided by the wg command. For the machine-readable representation of the current WireGuard status, I’ll use the wg-json script inspired by this blog post.
A common configuration interface was also required for WireGuard to implement this kind of functionality together with the packet filtering and NAT. I needed to control the configuration of WireGuard from a separate process/service, and therefore the configuration model was translated to an HTTP-based REST API. The decisions for the prototype implementation are available at the ADRs within the GitHub project.
The implementation of the WireGuard Container Endpoint is available on GitHub and is based on python and FastAPI using the WireGuard system tools and iptables on a system level. It’s also provided as an image on Docker Hub if you want to test it.
Summary and Conclusion
As you can see, WireGuard is at least in a Hub-and-Spoke scenario easy to use if you can deal with the static IP addressing and key exchange. There are also a ton of web interfaces available on the Internet that help you to manage WireGuard tunnels in this easy scenario (e.g. wg-ui or wireguard-ui). The easy setup and the open nature is also an argument for WireGuard. The missing/complicated possibility of the monitoring and the lack of privacy due to the static allocation of IP addresses can be seen as an argument against the use of WireGuard VPNs. If you need to bridge traffic across the VPN, WireGuard is not the right tool for you – Zerotier is an alternative in this case.
Anyway, in complex scenarios, WireGuard becomes somehow complex when dealing with the details. To address the failover scenario and to solve the incomplete client configuration while maintaining connectivity to the services was the goal of the WireGuard Container Endpoint as prototype implementation.
With WireGuard, there is one additional topic that I don’t mention so far in the post: You can overwrite the DNS settings of the client if you want to as soon as somebody is connected to the hub. This enables some additional Use-Cases, e.g. the accessibility to services that are not public or the sharing of applications like pi-hole to protect/control the DNS responses.
As a summary, I used the prototype implementation within one of my other side projects that required the configuration via an API and the client failover scenario. It worked fairly reliable so far. Furthermore, it was fun to build 😅
If you just require a basic Hub-and-Spoke solution to access some service, you can also take a look at the following tools/services:
- Tailscale (my personal preference for quick and easy VPNs)
- Zerotier (good if you need layer 2)
- Nebula/Defined.net (which works with certificates)
They solve some drawbacks mentioned above, the dynamic IP addressing (at least an automatic allocation of a static IP) and the key exchange for example. Tailscale, is easy to install and could also be a solution to the two scenarios (including the packet filtering) described in this post.
That’s it. Thank you for reading.
Resources and Further Reading
- Wireguard Project and Background
- Other Blog posts about WireGuard
- Docker & other Resources
- WireGuard Web-Frontends
- Alternative VPN tools
-
There are some efforts to allow dynamic addressing across the tunnel interfaces, e.g. wg-dynamic, but the Project seems fairly inactive. ↩︎
-
Addresses from the Unique Local IPv6 Unicast address space (RFC 4193) and should be pseudo-random allocated using an ULA generator, e.g with https://www.ip-six.de/ - to keep the explanations short, I’ll use addresses from the
FD00::/48in this post. ↩︎ -
As an additional challenge,
wgwon’t modify the routing table at all… ↩︎